Typing non-English characters is easy with the BeeRaider Keyboard. You can quickly create a wide range of non-English characters (e.g. French, German, Spanish, etc.) using a number of methods available with our keyboards.
Typing non-English characters can be realized using two main methods. The first of these involves using the Alt-Gr keys on our keyboards to easily access a readily available range of non-English characters. You can use our keyboards with the US Standard keyboard driver or the US International keyboard driver installed. The US International keyboard driver gives you access to a whole range of foreign language characters through the Alt-Gr key. The two layout graphics below show these for both our QWERTY and Optimized keyboards.
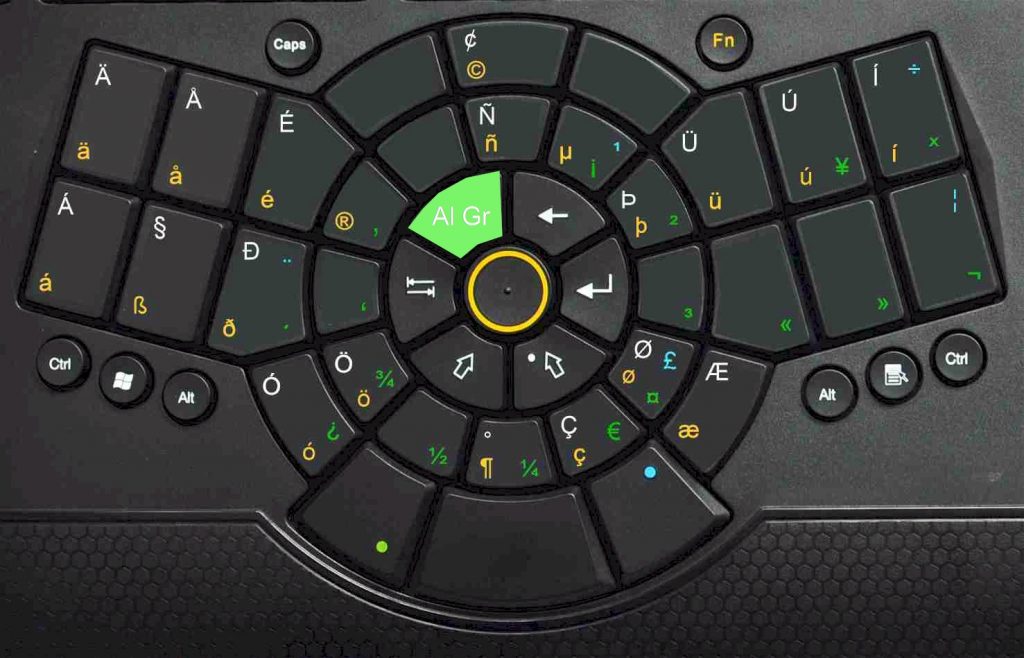
Alt-Gr characters for US QWERTY Radial Keyboard
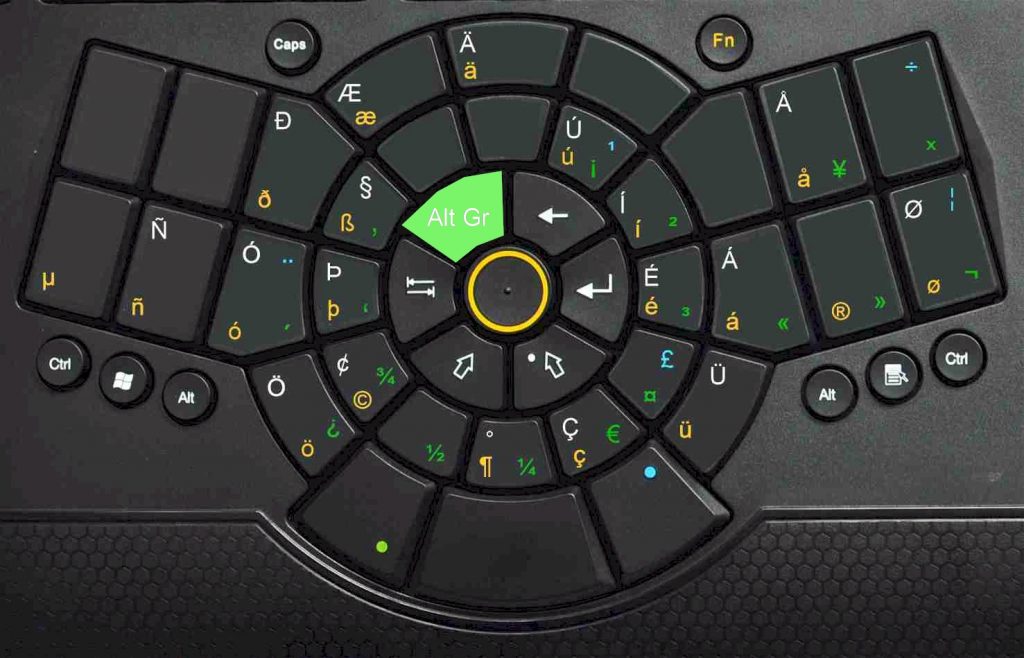
Alt-Gr characters for US Optimized Radial Keyboard
The second easy approach is to make use of the so-called ‘Dead keys‘ available on the layout(s) of our keyboards. This approach extends the range of available characters and is just as easy if not easier to use. The section that follows explains how to go about doing this.
How to use the dead-keys and Alt-Gr keys on BeeRaider’s keyboards when typing non-English characters
First Load the Right Keyboard Driver
You first have to load the US-International keyboard driver on your PC. This is fairly straight-forward and is done through the control-panel. Once this driver is loaded you will then be able to access a whole range of non-English foreign characters using either our QWERTY Radial Keyboard or our Optimized Radial Keyboard.
The following text will explain how to use the dead-keys (RED characters) on our keyboards. This method is probably the easiest way if the characters you require are available. If not, then this way and/or use of the Alt-Gr key will almost certainly supply the characters you need.
The US International Keyboard Layout
The US-International keyboard is useful as it works for many languages. It turns apostrophes, trema, tilde, and circumflex keys into “dead keys“. (Marked in red on the Optimized keyboard layout shown in Figure-1 below). When you press, say, an apostrophe, it does not show on the screen. The computer is waiting for the next key. e.g., (a vowel) you press ‘ and then e: you get é (accented vowel) e.g., (a consonant) you press ‘ and then h: you get ‘h (apostrophe + consonant) Accented consonants N and C: Use the ~ key + n for ñ and the ‘ + c for ç If you want to type the apostrophe or quotation mark by itself (e.g., before a vowel), press the apostrophe (or quotation mark) then press the space-bar then press the vowel.
Note: It’s important that the proposed keyboards operate in this manner when used with a Wintel device (e.g. desktop PC) that has the US International keyboard driver loaded. They will also operate in the expected fashion when the US Standard driver is loaded on these devices. In such a case, the ‘dead keys’ will not operate as they do with the US International driver installed, but will just produce the (RED) character straight-up. Figure-1 below shows the Optimized Radial Keyboard layout with these in RED, the QWERTY Radial Keyboard will also have these same characters in RED.
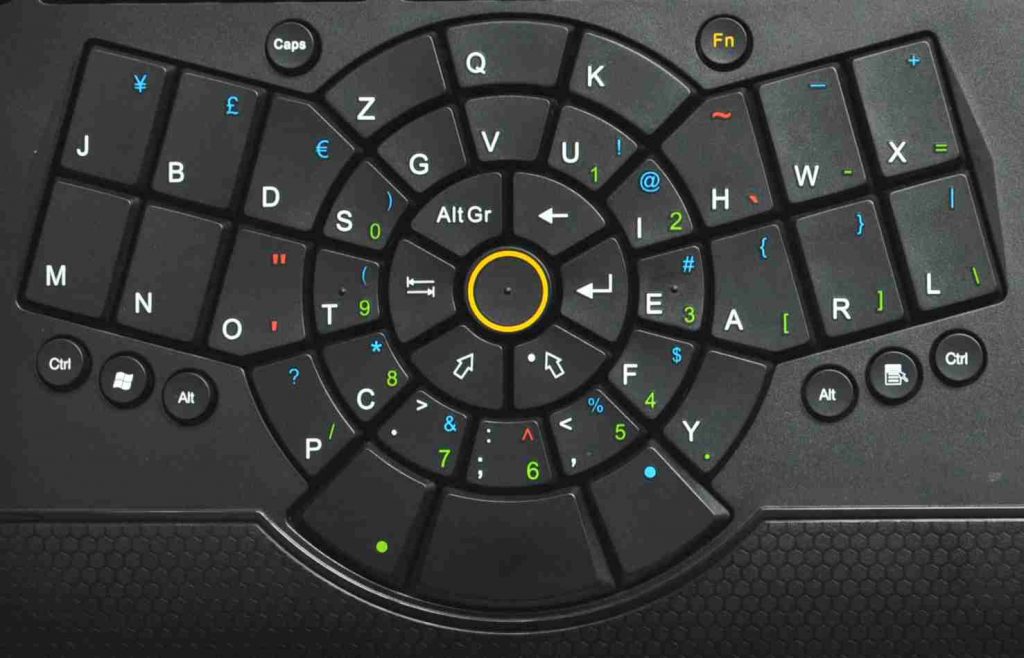
Figure-1 US Optimized Layout
Operation of Alt-Gr Key with both the Standard US and US International Keyboard Drivers
We can now look at what happens when the user selects the ‘Alt –Gr’ key. The Alt-Gr character layouts are produced on both keyboards (QWERTY & Optimized), when this key is operational and the US International keyboard driver is installed.
Let us look first at the operation of the ‘Alt Gr’ on the QWERTY Radial US Standard Keyboard layout, when used with the US International keyboard driver. Note that if the US Standard keyboard driver is loaded then the ‘Alt Gr’ key presumably has no purpose/function.
When the ‘Alt Gr’ key is active as shown in Figure-2, then the set of ‘Alt Gr’ characters encoded/produced should be as per the keyboard layout shown in Figure-3 below.
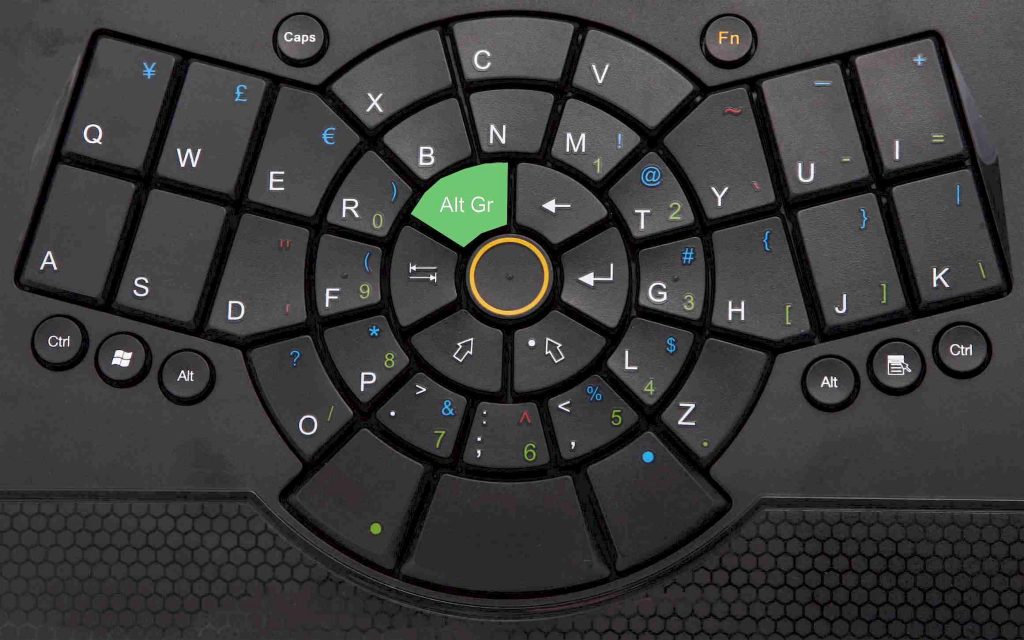
Figure-2 Alt Gr Active on QWERTY Layout
So, if the Alt Gr key is pressed and then the ‘Q’ character key-cap is simultaneously pressed next, then the actual character produced/displayed, will not be a ‘Q’ but an ä (a-umlaut), which is the default character as shown in Figure-3 below. Note that characters shown in orange are the default characters.

Figure-3 Available Alt-Gr characters for QWERTY layout with US International driver
These Alt Gr characters do not appear on the keyboard’s key-caps. Note that in order to produce the capital ‘Ä’, the user will first press the Alt Gr key and then press the Shift key followed by the ‘Q’ key shown in Figure-2 above.
The operation of the Alt Gr key for the ‘Optimized US International Layout’ shown in the following graphic and the corresponding Alt Gr layout for this as shown in Figure-5 below are discussed next.
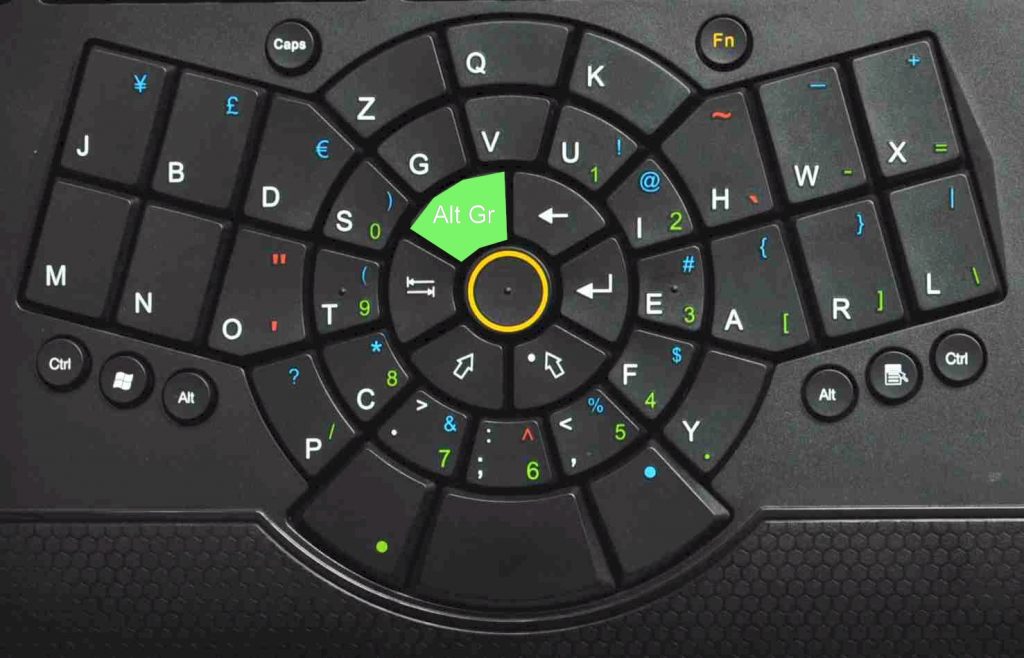
Figure-4 Alt-Gr Active on Optimized layout
If the Alt-Gr key is pressed and then (this time) the ‘Q’ character key-cap is pressed next, then the actual character produced/displayed, will not be a ‘Q’ but an ä (a-umlaut), which is the default character as shown in the following Alt-Gr keyboard layout of Figure-5.

Figure-5 Available Alt-Gr characters for Optimized layout with US International driver
Again, these Alt Gr characters do not appear on the keyboard’s key-caps. And again note that in order to produce the capital ‘Ä’, the user will first press the alt Gr key and then press the Shift key followed by the ‘Q’ key shown in Figure-4 above.
You may have need to access other alternative characters not covered by the discussion above. These extended ASCII characters or Alt-Codes can be obtained by the use of the left-side Alt key on our keyboards in combination with the numbers on the numeric-pad. This (Alt Num) method should work regardless of which keyboard driver is loaded, US or US International. Simultaneously hold the left-side Alt key while typing the desired character’s numeric code on the numeric-pad. Consider the following examples showing the numeric codes for the three currency symbols. ¥ = Alt 0165; £ = Alt 0163; € = 0128. Of course you need to know the numeric code for the character(s) you wish to produce when using this method. You can find these codes listed at the following link:
You might want to print the codes out and pin the printout up in front of you for future reference.
In conclusion, you should now see that typing non-English characters on a BeeRaider Keyboard is really quite straightforward.